 iPhone 14 Pro
iPhone 14 Plus
iPhone 14
iPhone 13 Pro Max
iPhone 13 Pro
iPhone 13
iPhone 13 Mini
iPhone SE 2022
iPhone 12 Pro Max
iPhone 12 Pro
iPhone 12
iPhone 12 Mini
iPhone 11 Pro Max
iPhone 11 Pro
iPhone 11
iPhone XS Max
iPhone XS
iPhone XR
iPhone X
iPhone SE 2020
iPhone 8 Plus
iPhone 8
iPhone 7 Plus
iPhone 7
iPhone 6s Plus
iPhone 6s
iPhone 6 Plus
iPhone 6
iPhone SE
iPhone 5s
iPhone 5c
iPhone 5
iPhone 14 Pro
iPhone 14 Plus
iPhone 14
iPhone 13 Pro Max
iPhone 13 Pro
iPhone 13
iPhone 13 Mini
iPhone SE 2022
iPhone 12 Pro Max
iPhone 12 Pro
iPhone 12
iPhone 12 Mini
iPhone 11 Pro Max
iPhone 11 Pro
iPhone 11
iPhone XS Max
iPhone XS
iPhone XR
iPhone X
iPhone SE 2020
iPhone 8 Plus
iPhone 8
iPhone 7 Plus
iPhone 7
iPhone 6s Plus
iPhone 6s
iPhone 6 Plus
iPhone 6
iPhone SE
iPhone 5s
iPhone 5c
iPhone 5


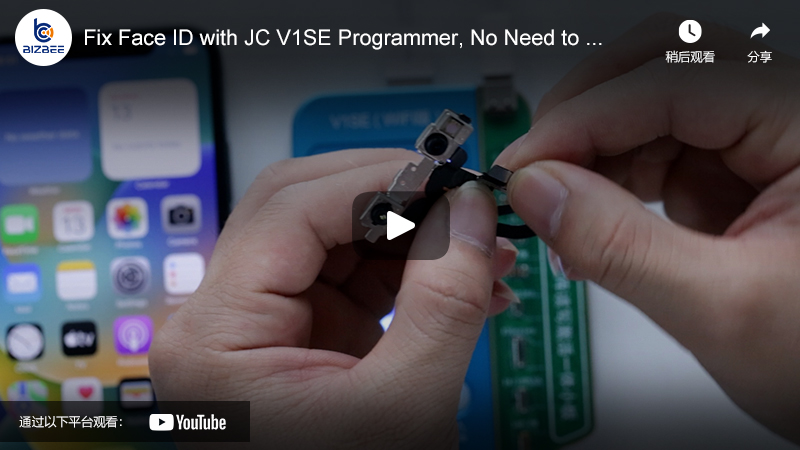
Not long ago, we taught you a simple method of repairing the face ID. Using the AY A108 programmer and AY dot matrix flex cable, there is no need for soldering and jump wiring, and the operation steps are very simple. However, using this method, you need to download the AY software on the computer, and connect the programmer to the computer to restore the data. Now we have an easier way to restore the face ID, without soldering and jump wiring, or downloading any software, let's show you.
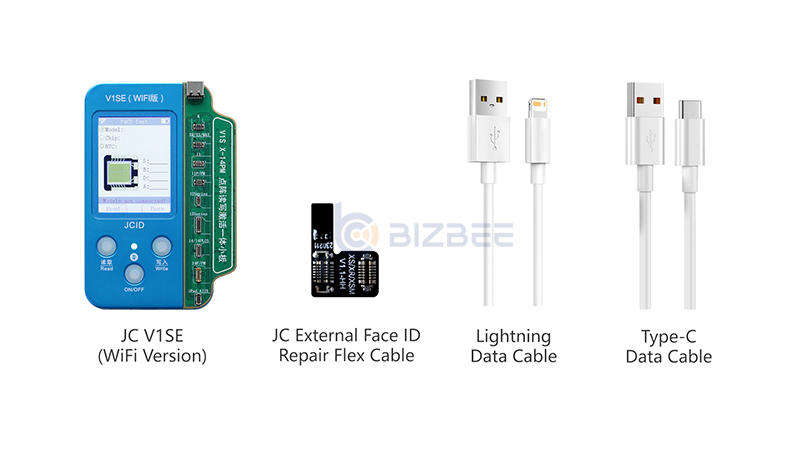
Tools we need: JC V1SE (WiFi version), JC External Face ID Repair Flex Cable, Lightning Data Cable, Type-C Data Cable
Watch the video:
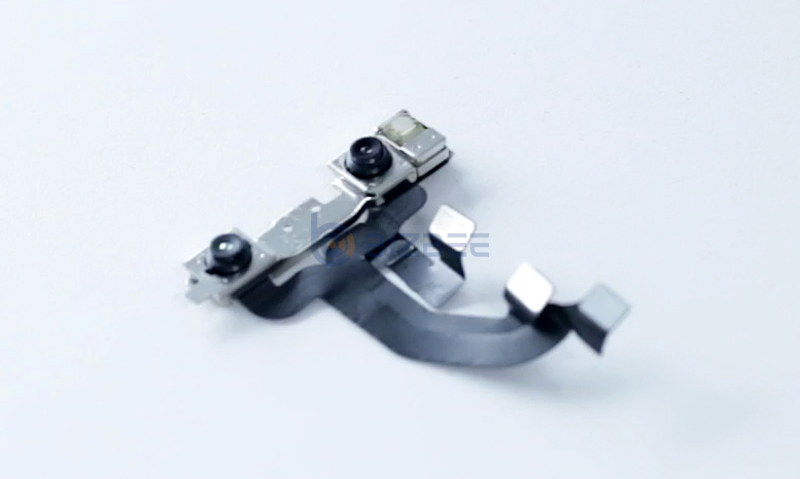
Step 1: Remove the front camera assembly
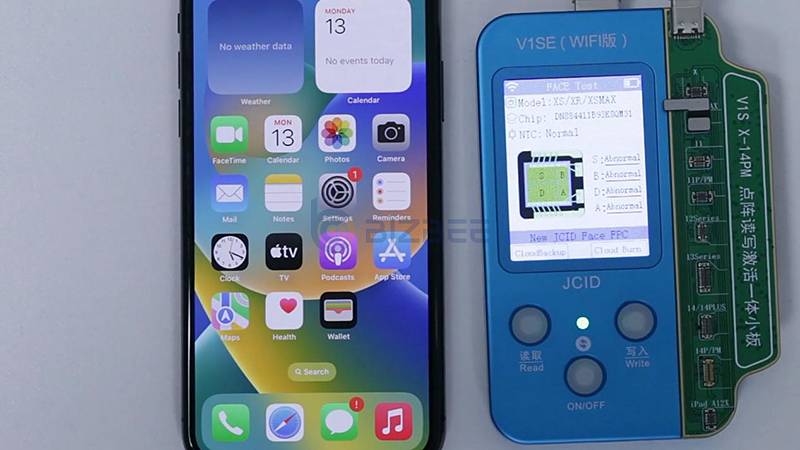
This is an iPhone XS with disabled Face ID. The setting page displays the prompt "A problem was detected with the TrueDepth camera. Face ID has been disabled." Now turn off the phone and remove the screen, battery and front camera assembly.
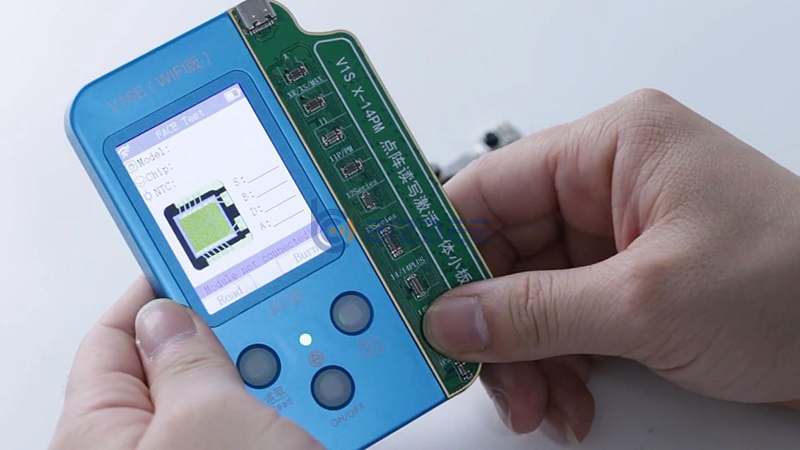
Step 2: Install the JC V1SE Programmer
Take out the JC V1SE Programmer and JC Dot Matrix Extension Test Board, install the test board and programmer. Connect the type-c port of the test board to power supply through the type-c data cable (fast charging is required). Connect JC V1SE programmer USB port to the lightning data cable for connecting the phone.
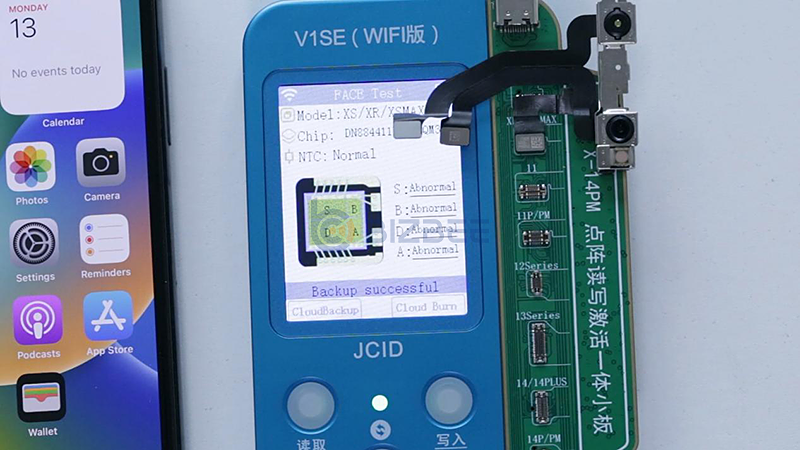
Step 3: Backup the face ID data of the dot matrix flex cable
Install the battery and screen and turn on the phone. Connect the phone to the V1SE programmer. Connect the dot matrix flex cable to the programmer to detect the fault, and it shows "Abnormal" "Fuses, Please replace the IC!". Press "Write" button to switch to the activation interface. Press the "Write" button again to activate. After the activation is complete, press the "Read" button to exit. Press the "ON/OFF" button to switch to the cloud backup interface. Then press the "Read" button to back up face ID data. Backup successful.
Step 4: Write the face ID data into the JC external face ID repair flex cable
Take out the external face ID repair flex cable. Take off the original dot matrix flex cable, and install the external face ID repair flex cable on the V1SE test board. Press the "Write" button first. When it shows "query successful", press the "ON/OFF" button again to write the cloud backup data into the external face ID repair flex cable. When it shows "Burning will overwrite the original data Do you want to continue burn?", press "Read" to Ensure. Press "ON/OFF" to Ensure again.
Step 5: Install the external face ID repair flex cable and test
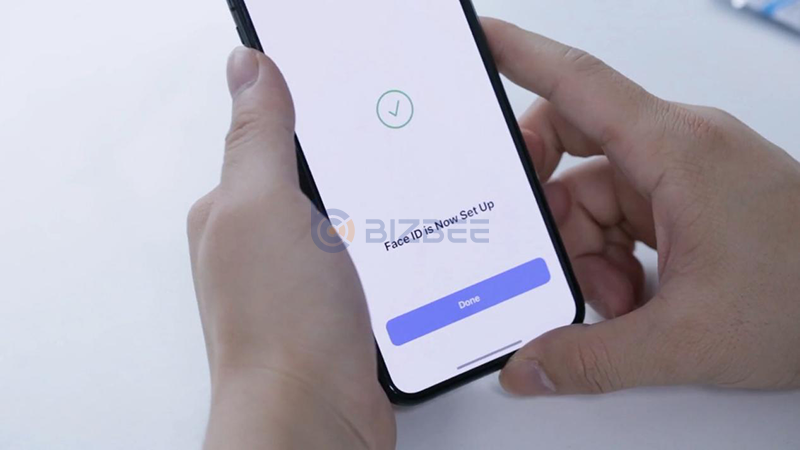
Take out the external face ID repair flex cable and install it on dot matrix flex cable. Turn off the phone again, take out the screen and battery. Install the front camera assembly back into the phone, and install back the battery and screen. Turn on the phone to test face ID function. The face ID function now is normal.